Thursday, January 27, 2011

Technical Bits: Lifelines

In a recent discussion on the Ravelry board for A Stitch in Time volume 1, the issue of lifelines came up in relation to the pattern Knitter's Delight


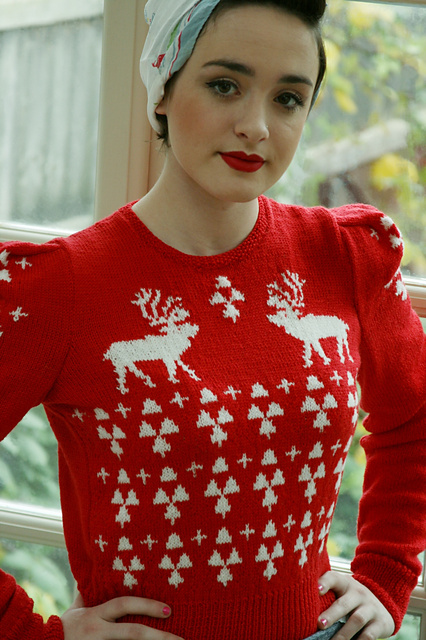
As you can see from the image of Knitter's Delight, above, it is a lace pattern. This is where the lifelines come in... If you have never knitted lace because you are worried about messing up the pattern, or if you have tried and struggled and ended up ripping it out, then you need to know what lifelines are.

 Used under Creative Commons from The Bees
Thanks, Annie!

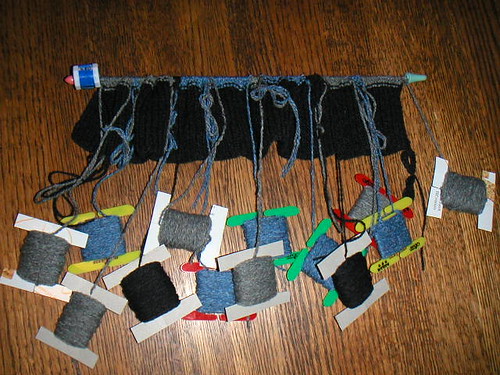
A lifeline, in knitting terms is a safety net which provides a place to unravel your knitting back to if you make a mistake. You can see from the image above that this knitter has used a contrasting piece of crochet cotton, threaded through the stitches at a point where her lace pattern changes charts.

You might choose to use a lifeline after each lace repeat or half repeat if it is a large complicated one. Lifelines are predominantly used in lace knitting because it is difficult to tink (knit backwards to unpick) or unravel the multiple yarn-overs and k2togs that make up the pattern. However, they are a really good addition to any complicated knitting pattern, especially one using a technique that you are trying out for the first time. There's nothing stopping you adding lifelines to your fair isle, cables or anything else you fancy.

Used under Creative Commons from Dave's Portfolio

But how do you add a lifeline? 
You already know that it is an extra, separate piece of yarn threaded through a row. It should be threaded through the live stitches either by using the piece of yarn on a darning needle after you have completed the last row of the repeat, or if you have interchangeable needles, you can put the yarn through the tightening hole in the cable and knit it through the last row as you go.  It is possible to add a lifeline further down your knitting by using a darning needle, but this makes it more fiddly to catch all of the increase and decrease stitches. 

Top tip: be careful not to thread your lifeline through a stitch marker, or it will not be possible to slip the marker on the next row.
The knitter whose work you saw in the picture above used a contrasting cotton crochet thread, so it would both be easy to see and also to remove from the knitting afterwards. Linen thread and waxed dental floss are also good to use. If you don't have any of these handy, just make sure that you use a yarn that is a lighter weight than the main yarn you are knitting with and that it has a smooth finish.

Important Addition!

Annie pointed out to me that it was all very well telling you all how to make a lifeline and what it was for, but what about how to frog your knitting back and get your stitches back on the needles?!

All you need to do to rip back to the lifeline is to slip the knitting from the needles, carefully unravel the knitting (this may be more difficult if you have something which has mohair in it, like Kidsilk Haze). Once you get to the lifeline, you won't be able to unravel any further. This is the point where you will need to put the knitting back onto your needles.

Carefully insert the needle into the first stitch that has the lifeline through it, and pop it onto the needle. You can either take the lifeline out of each stitch as you go along, leave it til the last one is done, or just leave it in to continue being a lifeline (I prefer leaving it in, especially if I've gone wrong once!) Move on to the next stitch, popping it onto the needle and continue until you get to the end of the row. You will be left with a correctly knitted row which will have no dropped or twisted stitches.

Basically then you continue on as you were before, and if you make another mistake that warrants frogging a few rows, you have a lifeline there still.

Happy lifesaving!
Ingrid x

Labels:

Thursday, December 09, 2010

Technical Bits: Intarsia

Following on from last week's post about Fair Isle, this time we are looking at another colourwork technique: Intarsia. This method is used when blocks of colour are required, rather than a smaller repeating pattern. A good example of this are the reindeer on The Perfect Christmas Jumper, below.

The Perfect Christmas Jumper. Image copyright Arbour House Publishing.

Motifs are worked with separate balls or bobbins of yarn, producing a garment only one layer thick (rather than Fair Isle's double layer of wool. Before starting to knit, you will need to prepare by winding small balls or bobbins full of each colour to be used. Bobbins are often easier for this, as it makes it easier to untangle the inevitable twisting turning yarns.

As always, knit a swatch up first ...I'm sure that you always knit a tension square anyway, don't you ;) But seriously, knitting a swatch for colourwork knitting is particularly important in order to gauge the tension, and to have a practice of the techniques, if you haven't done it before.

Image by ActionHero on Flickr. Used under Creative Commons license.

When changing from one colour to another it is best to bring the new colour over the colour you have just finished using. The twists will show up on the purl side of the work (intarsia works best with stocking stitch). Try not to twist the yarns too tightly around each other or the work will look rather pinched, but be careful not to do it too loosely either or you will be left with a hole. This is where the practice swatching really comes into its own.

On the vertical lines of your pattern, you will need to twist the yarns on each row, but on diagonal lines you'll need to only twist on the rows where the yarn colour changes at the same point as it did on the row beneath.

As with Fair Isle patterns, charts are really essential for Intarsia. It is very difficult to follow written-only instructions

Align CentreHearts and Bunnies Cardigan. Image copyright Arbour House Publishing

If you'd like to try out some Intarsia, you could try one of the following patterns:

The Perfect Christmas Jumper: Ravelry link and Knitonthenet Shop link to the pattern

Hearts and Bunnies Cardigan: Ravelry link and Knitonthenet Shop link to Vintage Gifts to Knit

Happy knitting!
Ingrid x

Labels: , , ,

Tuesday, July 20, 2010

You're Never too Old to Learn a Lesson

A couple of days ago I was rooting through my freezer for something to defrost for yesterday's lunch. I fancied some soup and after looking for a little while found what I was sure was a little container full of yummy miso soup with mushrooms and sweetcorn.

So, yesterday, at lunchtime I was all set to eat said soup (with the addition of some fresh beansprouts - yum). Well. Except what I thought was the lovely miso soup was actually some kind of vegetable and unrecognisable meat stew combo. Really not what I was expecting.

I bet you're wondering why I'm telling you this, aren't you?
Well, I did somewhat the same thing with a UFO a little while ago. 'Yes', I thought, having stashed away this particular cardigan for a year because I found more new and exciting things to knit, 'this cardi is just the thing and I have lots of the yarn left, so let's get on with it.'

That bit there, the 'I have lots of the yarn left' part... well, I had lots of yarn left that looked like the same yarn. In the semi-darkness. While I was watching TV and not paying a huge amount of attention.

Image copyright, Ingrid Murnane

You can't see it so well from this picture, but the bottom half and part of the arms are a rather different shade of red. Not just a different dyelot, but an entirely different colourway. To add insult to injury, I realised that I'd knitted another cardigan for my Mum in the yarn left from this one, instead of the newer, differently-shaded yarn that I had bought especially for it. The upshot of it was that my red cardigan was frogged.

This is the point where you say, '...but Ingrid, you seem like a quite well organised person. Don't you keep a little notebook with all the details of each project, or do the same on Ravelry?' Er, well I do now! Quite obviously I didn't before, but the Red Cardigan of Doom has taught me a lesson. It is one that I'll be extending to my cooking life as well now.

Without sounding like a public information advert, if this is a problem that you have yourself, Ravelry has great options on their project pages to add in the yarn and needles you are using and even the shade and dyelot. Brenda Dayne also gave some great advice on how she keeps record cards for each project she makes a while back on Cast On (I'm really sorry that I can't find the actual episode).

Another extra, but really useful thing that you could do alongside keeping 'real life' notes in a book or card system is to keep some of the yarn that you used for mending. Even better (and to follow a wartime tradition) you could make the buttons for your garment by knitting them and stuffing them with the yarn, so there is always some available and it will have been washed to the same extent.*

So, after the fiasco of the miso soup and the frogging of the Red Cardigan of Doom, the moral of the story is: keep proper records of your stuff, people: you won't regret it!

Ingrid x

*Thanks to Jane Waller and Susan Crawford for that great advice!

PS I ended up having a marmite sandwich and a banana, if you were wondering.

Labels: